Free Digital Marketing Review
We’ll show you how to hit your business goals with result-driven digital marketing.
When it comes to local SEO, the first thing to do for any local business is to get your Google My Business (Now Google Business Profile) profile set up.
This is how you appear on Google Maps and localised Google searches, which could be a huge boost for your business.
Almost any local business is eligible for a (free!) listing. Don’t have a physical location and only do deliveries? No problem. Don’t have a website? Not a requirement!
Read on for a step-by-step guide on how to set up Google My Business.
Why you should set up a Google My Business profile
A Google My Business listing is the foundation of any local SEO strategy.
A Google My Business account will allow you to show up in both Google Maps and what’s been variously called the Google ‘local pack’, ‘3 pack’, ‘snack pack’ or ‘map pack’ results.
These many names all refer to the same thing: the three businesses that appear in a separate section above the regular organic results on Google when people search for local terms.
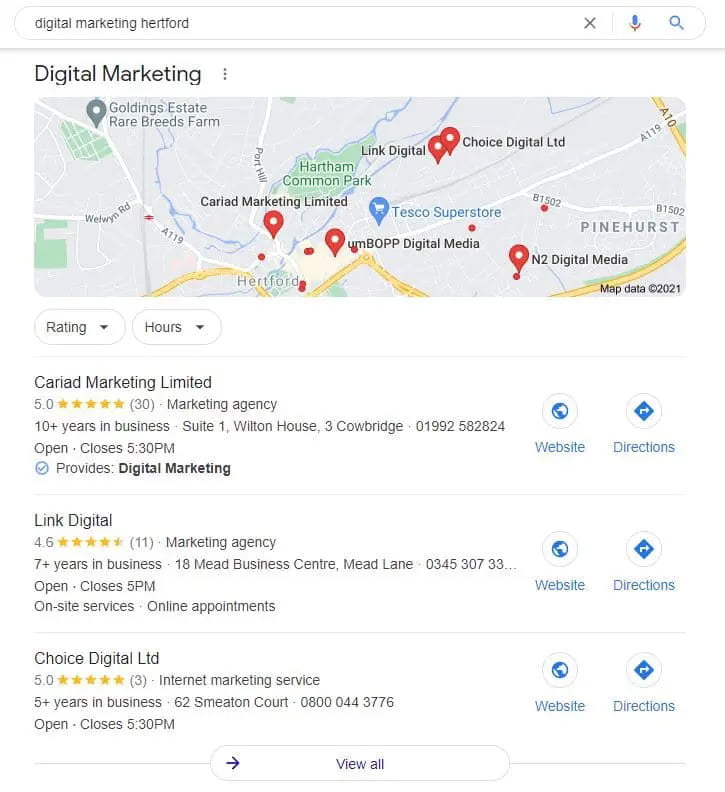
These are the businesses Google deems most relevant to the searcher’s query. The local pack results are the first thing most searchers look at, so are definitely somewhere you want your business to appear.
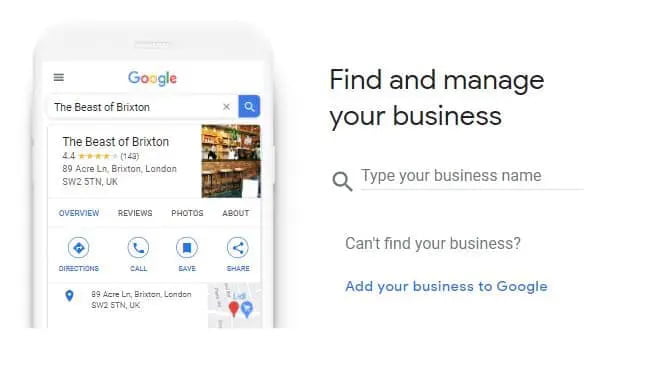
Step 1: Check if you already have a Google My Business listing
In some cases, you may find that you already have a Google My Business listing despite not having made one yourself.
To check if you already have a listing, just go to https://business.google.com/create and search for your business name.
You will need a Google account to do this, so go ahead and set one up if you don’t already have one.
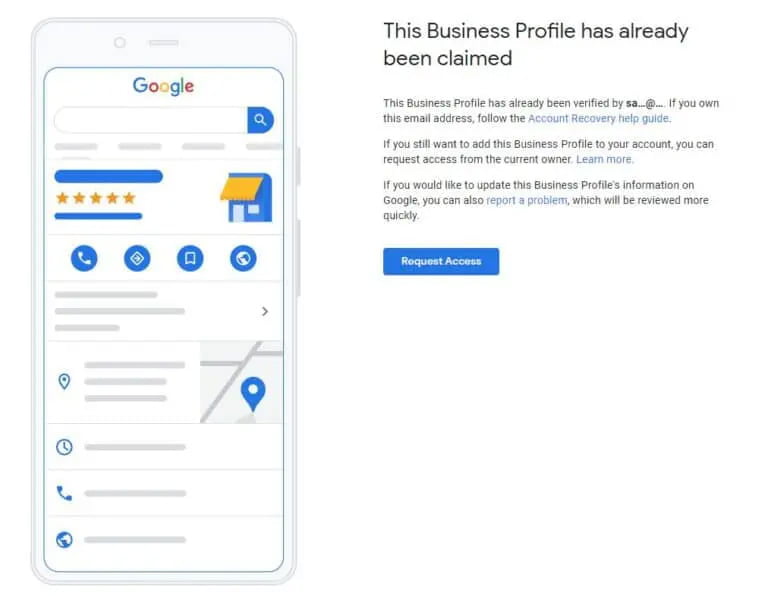
Step 2: Claim your business if a listing already exists
If your business already has a listing, what you need to do next depends on whether the listing is claimed or unclaimed:
- If the listing is unclaimed: Google will give you the option to manage the business listing. Click ‘Manage now’ to proceed. It will then ask you to review the existing information and complete the verification process (there are a few ways to do this depending on your business type, we’ll explain these below). Once you are verified, you will be able to edit and control the existing listing.
- If the listing is claimed: Google will tell you that it has already been verified. This could be you under another email address (it happens to the best of us!) or somebody else. Of course, if it is you, try to regain access using that email address. If it’s someone else, click ‘Request Access’, provide your details and Google will send the current owner your request.
- If a listing already exists, it’s best to claim it rather than create a new one.
Leaving a business listing unclaimed or claimed by someone else is a big mistake, as Google may display incorrect information and you won’t be able to respond to reviews.
If you can’t find a pre-existing listing, click ‘add your business to Google’ to start setting up your business profile.
Step 3: Choose your business name
Google will ask for your business name during the setup of your account. This may seem straightforward, but many business owners get it wrong and end up violating Google’s guidelines and getting their listing disapproved.
Google has rules to limit keyword stuffing in business names. Do not add anything to this field that is not your actual business name. Do not add locations, keywords or taglines in this field if they are not part of your official business name – it can look spammy and is not worth risking your listing being flagged for being in violation of Google’s rules!
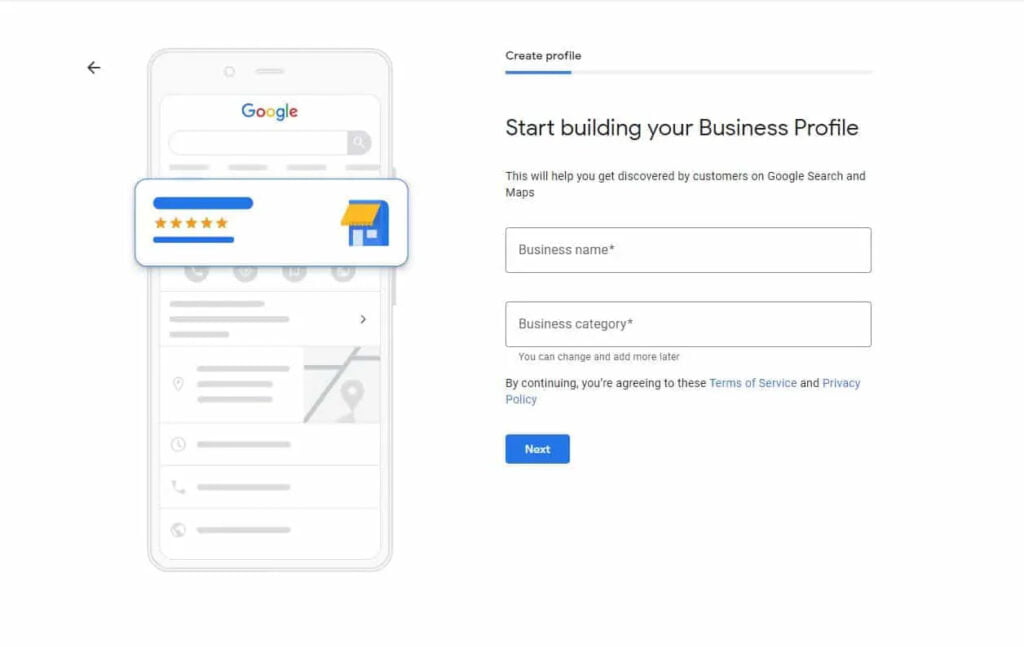
Step 4: Choose your business category
You are also required to select a primary category for your business at this stage (you can change this or add secondary categories later).
You can’t create your own categories, but Google offers an extensive list of categories to choose from so this shouldn’t be an issue for most. Try to pick a category that is reasonably specific to your business’ niche rather than casting the net too wide.
For example, if you run a tennis club, choose the more specific primary category ‘Tennis Club’ rather than the more general category ‘Sports Club’. This helps both Google and searchers to understand and find your listing.
For ideas on appropriate categories, look up your competitors’ Google My Business listings (you can find these by searching for their business names or a target industry keyword on Google Search or Google Maps). In some cases, Google won’t have a category for your specific niche, so you may have to choose something more general.
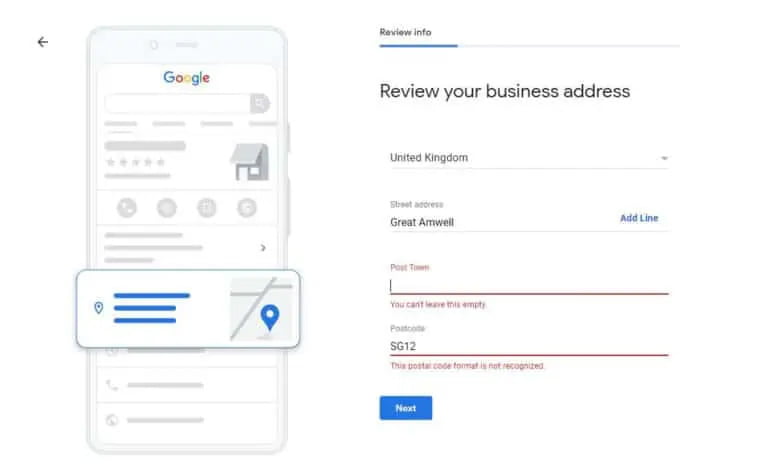
Step 5: Designate your location and/or service area
When setting up your account, Google will ask if you have a business address.
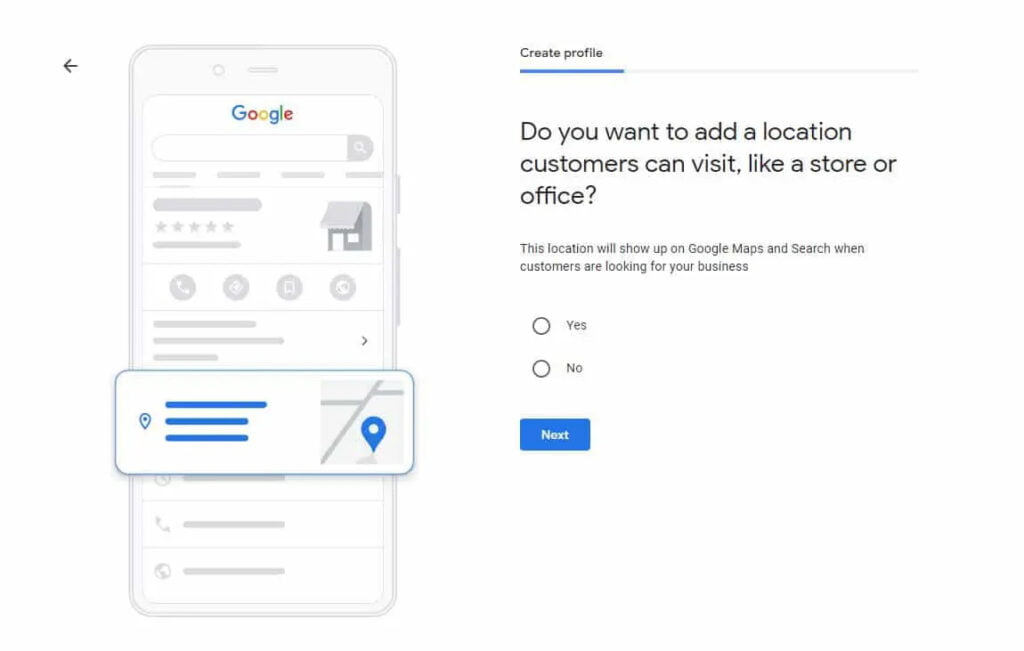
If you have a shopfront that you want customers to come to, select yes and fill in your address. The address in this field will be displayed publicly, so avoid putting your home address if you don’t want it advertised! Google also requires addresses in this field to have signposted shopfronts, so only fill it in if you have a physical business location with permanent on-site signage.
If you are a service area business that specialises in deliveries or mobile services – e.g. you go to the customer rather than they come to you – select no. Instead, you can list the locations you serve, meaning your listing should show up when people from those locations search for your services. You can also do this if you are a hybrid business that both has a shopfront and travels to customers.
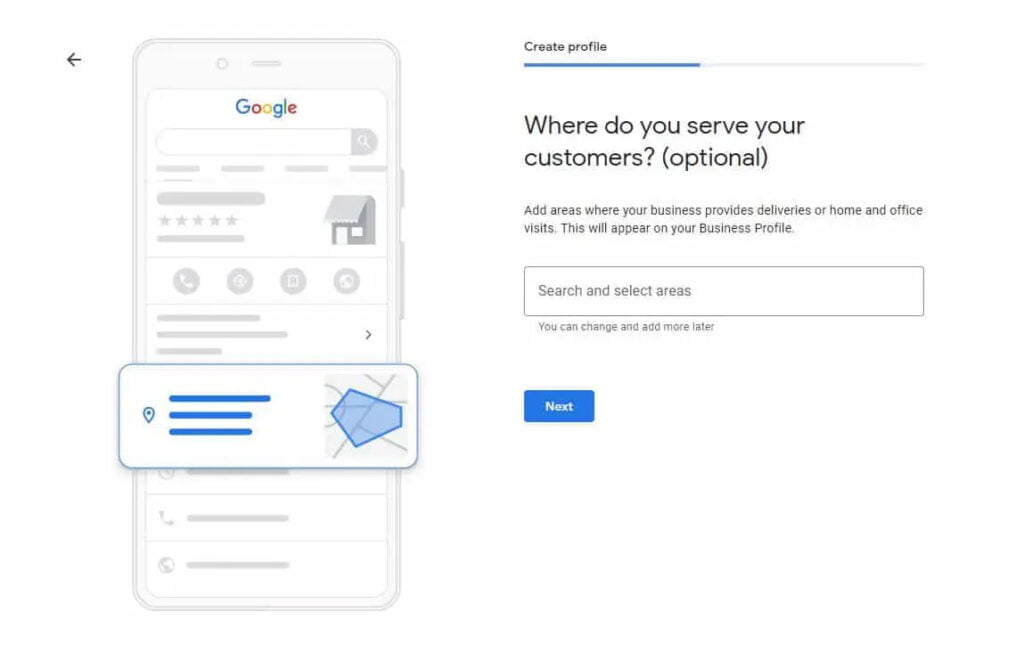
You can add up to 20 locations – but only add places you are actually willing to travel to! Adding irrelevant locations may get you more impressions but will cause customer dissatisfaction and ultimately damage your local SEO.
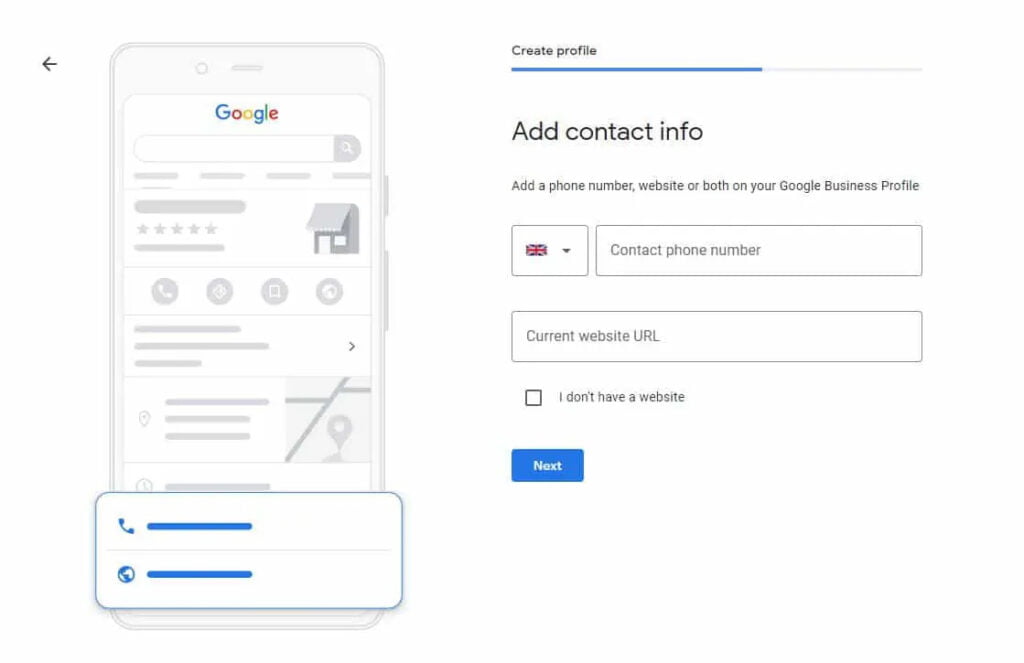
Step 6: Enter your contact information
Google will then ask you for your phone number and website URL. These appear publicly so make sure to put your business contact number here. A phone number is compulsory but a website isn’t, so don’t worry if you don’t have one.
Step 7: Verify your Google My Business listing
The verification process typically involves having a code sent to your business address (you can use a home address that your business operates from in this field, as it won’t be displayed publicly), which can take a few days.
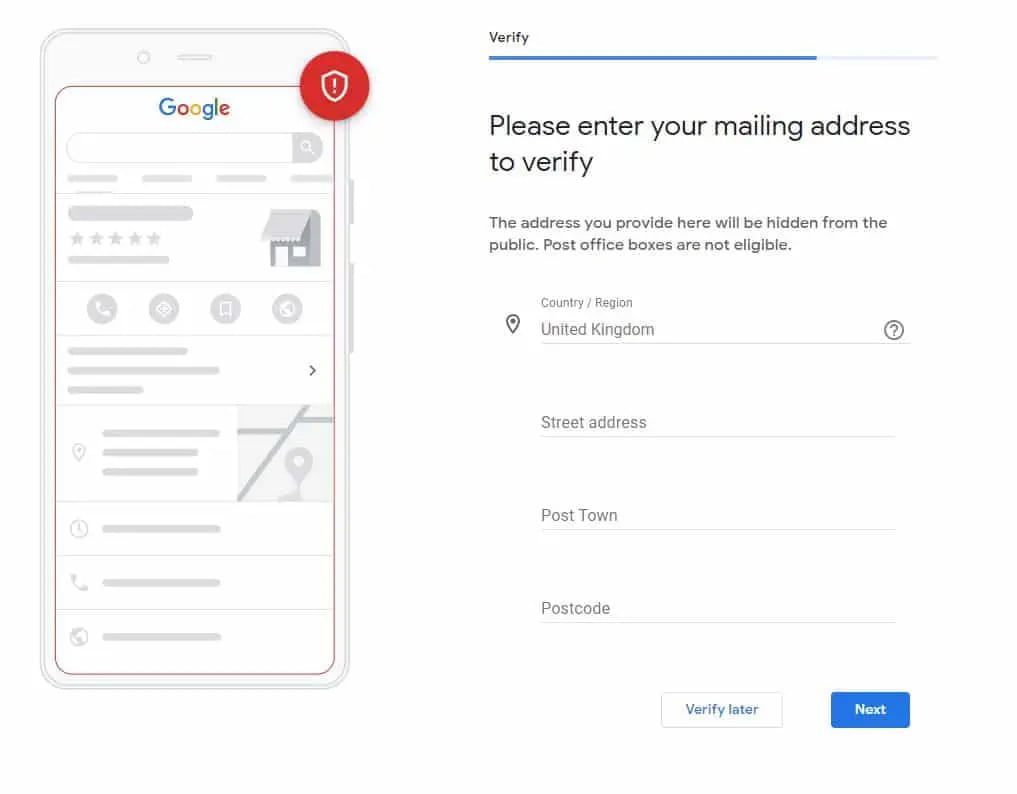
If you are a service-area business and don’t have an address you can have a postcard sent to, select ‘Verify later’ and you may be able to verify by phone, text, email, video recording or Search Console. See Google’s guidance for details on these alternative verification methods.
Step 8: Optimise your listing
Once you have your Google My Business account set up with your basic details, there are some additional, optional features you should definitely take advantage of. Here are a few you should prioritise:
- Make sure to add a business description that sums up your services and differentiates you from your competitors
- Add the services you provide. For example, if you are a hairdresser, you can specify if you offer services such as hair extensions or highlights. This helps searchers to see if you provide the exact service they are looking for
- Include your opening hours so your customers can see your availability at a glance
- Upload your company logo for added professionalism and brand recognition
- Upload some photos that represent your business. If you have a physical shopfront, take a few pictures of it from different angles. If you don’t have a physical location, try some pictures of branded merchandise such as a delivery vehicle or a business card. Pictures of your team are also a great addition to your listing as they add a friendly, personal touch
- An often-underutilised feature of Google My Business is the option to create posts. With this feature you can post short updates that will appear as part of your listing in the search results.
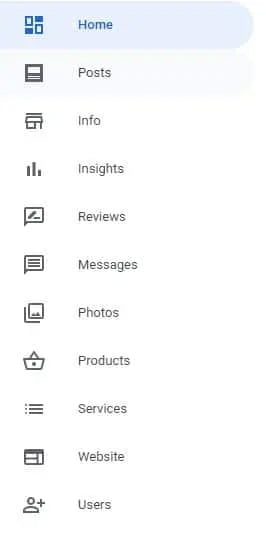
Some of these can be added during the initial setup process, or you can skip and go back and add them later from your account sidebar:
Conclusion
Having a Google My Business profile is an easy win that many local businesses overlook. It’s really a no-brainer for most local businesses to have a listing: it’s free, isn’t too difficult to set up and is a great way to start reaching more local searchers.
We hope this step-by-step guide was useful and will help you get set up on Google My Business. If you need any more advice on Google My Business or local SEO in general, get in touch and we’ll see how we can help!

Need help with your website and marketing?
Book a FREE growth strategy session with our experts
Our award-winning team will review your website and marketing goals to provide you with crucial insight and advice.

4.9 STAR
Google reviews
With 10+ years of experience, Link Digital has helped hundreds of businesses to succeed online. We can help yours too!